Author Geraldine Tew is the founder of The ReCreators, a Social Enterprise based in Auckland, New Zealand, which promotes up-cycling, supports local artisans, and runs DIY workshops.
Get festive by decorating your home with these easy up-cycled DIY ideas using old items and materials you can find around your house or from your local op-shops.
No Sew Xmas Wreaths

What you will need:
- Old Hose or Small Bike Tyre
- Heavy Duty Carton Cutter
- Duct Tape
- Fabric Scraps
- Fabric Scissors
Method
- Cut your hose to your preferred circle size. Make a slit down the middle on one end and slot the other end in. Then, use a strong tape to seal it.
- Using your fabric scissors, cut heaps of fabric strips 3 cm wide and 25cm long, using a variety of colours. They can be Christmas colours: red, green and white.
- Tie each strip around the hose hoop/tyre and double knot. Vary colours as you go. Repeat and push tight until you fill the whole hoop.
- Get 3 long strips of t-shirt yarn and plait together to make a circular holder for your wreath.
Tip: Use a thicker strip of fabric and add a bow on the top.
Wooden Cup Coasters

What you will need:
- Wood Slices (thick branch and mitre saw)
- Paint and brushes
- Acrylic Gloss
Method
- Use a relatively thick branch to cut into wood slices. Leave out in the sun to dry if damp.
Tip: You can sand and oil your coasters first.
- Paint your designs on. It can be Xmas themed or have names of everyone attending your Christmas party so each guest has a coaster to differentiate their cups.
- Once the paint is dried you can seal your design with an acrylic gloss.
Santa Claus Napkin Ring

What you will need:
- Toilet Rolls
- Glue
- Paper
- Marker
Method
- Collect your toilet rolls.
- Glue and wrap each toilet roll in red paper.
- Cut a thick strip of white felt fabric or white faux fur and glue on the top and bottom of the toilet roll. Tuck in any extra fabric and glue down.
- Cut a thin strip of black paper for the belt and a white or yellow buckle to stick on top.
Tip: You can write names onto each napkin ring.
Air Dry Clay Gnomes

What you will need:
- Flour
- Salt
- Water
- Wooden spoon
- Cardboard paper 2x
- Compass
- Pencil
- Tape
- Scissors
- Knife
Method
- Using a compass, draw a cone on the right angle of a piece of cardboard paper. You can fit two cones on one sheet. Cut the cone shapes out and tape the sides together.
- Mix 2 cups of flour and 1 cup of salt in a large bowl. (Gives you four gnomes).
- Slowly add ½ cup of water to the flour/salt mixture and use a wooden spoon to mix.
- When clay ingredients start to combine, knead the dough with hands for 10-15 mins. Adding a little bit of water, if the clay is feeling too dry and not stretching well. Do not add too much water as the clay will be too sticky and hard to work with.
- Divide your clay into five pieces. One piece will be divided into four and set aside to make all the noses and draping shape of the gnome hat.
- You want to flatten out one of the big pieces of clay on a table with your hands. Not too thin that you can’t peel off the clay without it ripping.
- Dip your fingers into a cup of water and make the cardboard a bit damp so that the clay dough will stick. Carefully pick up the clay and drape around the cone (smooth side facing out) and pinch where the clay meets each other and remove the excess. Use the excess clay to cover the rest of the cone.
- Grab one of the smaller pieces you had divided for the nose and hat. Rip a good amount of clay for the nose, roll it into a ball, and set aside. Roll the remaining clay into a worm.
- Using a butter knife, you will draw a curved line of where the hat will drape over the face of the gnome. Create straight or curvy lines for the beard.
- To help the clay stick better, add a bit of water to the curved line and place the worm shaped clay on top. You will need to flatten and blend the back half of the clay into the hat. Use water to smooth out any lines and lumps in the clay.
- Lastly, add the ball of clay under the draping hat for the gnome’s nose.
- Repeat steps again for the remaining three gnomes.
- Leave the gnomes to dry by the window for direct sunlight. Be sure to rotate so the back side can set. Depending on the weather, gnomes should dry within 3 consecutive days of sun. The clay turns white when dried.
- We recommend using acrylic gloss to coat the gnomes first. You can paint directly onto the clay but you may find that the paint peels and does not stick well because of the flour. The acrylic gloss takes 3 hours to dry.
- Paint the gnomes to your preference and add designs.
- Coat again with acrylic gloss. If you are displaying it outside in your garden, you should coat the inner bottom half of the cone generously to stop the cardboard from soaking up water on the ground.
Upcycled Stockings
What you will need:
- Preloved fabric of your choice
- White fabric
- Marker
- Templates
- Fabric scissors
- Needles, pins and thread
- Ribbon (optional)
Method
- Fold your main fabric in half, right sides facing and draw a santa sock on one side.
- Pin the two fabric layers together so they don’t move around when you cut.
- Using a pair of fabric scissors, cut around your template leaving a 1 cm hem.
- You will sew on the line you have drawn, from the top right corner of the boot all the way round the bottom and up again, leaving the top of the boot open. Make sure not to pull the thread too tightly as you sew around the inner curve of the sock as the fabric will wrinkle up. Turn right-sides out.
- Measure the circumference of the stocking opening by wrapping the fabric around, make a mark of where the stocking stops, and add a centimeter hem, the height of the fabric should be 12cm.
- Sew down the opening end of the white fabric. Flip right sides out.
- Tuck the white fabric inside the top of the stocking, align the sewn side of the white fabric along the sewn side of the stocking, match the edges up and pin together. Sew along the top of the stocking.
- Pull out the white fabric, roll it in half and then roll again to complete your stocking!
Tip: Personalised stockings by adding buttons, iron on images, embroidery, paint names, etc.
Hand-sewn Baubles

What you will need:
- Fabric
- Stuffing
- Fabric Scissors
- Needle
- Thread
- Buttons
Method
- Draw out two circles, pin together and then cut out.
- Pick out the buttons you want to place on your bauble and arrange them on your fabric, so you know that the design will fit on your bauble. You can cut out fabric shapes too if you prefer a green triangle tree with red button baubles. For a Christmas tree, you will need ten green buttons and one big brown button. Search up other designs you can create with buttons!
- After finding the right arrangement, attach the brown button first,sewing on the right side of the fabric. Make sure to go through the button holes twice to make it more secure, then keep placing the next button until you form a triangle shape tree.
Wool Xmas Tree

What you will need:
- Cardboard/Parchment paper
- Compass
- Scissors
- Yarn of Wool or Twine
- PVA
- Candles
- Gloves
Method
- Using a compass, draw a cone on the right angle of a piece of cardboard paper. You can fit two cones on one sheet. Cut the cone shapes out and tape the sides together.
- Wrap the cardboard cone with parchment paper. Glossy side up.
- Soak the yarn in pva and start wrapping the yarn around the cone, trying to cover all the big gaps. You may want to wear gloves for this. You can alternate between green, red, and white yarn or stick to one colour.
- Leave to dry for an hour or use a hairdryer.
- Carefully peel from the cone.
- Add a battery powered candle underneath.
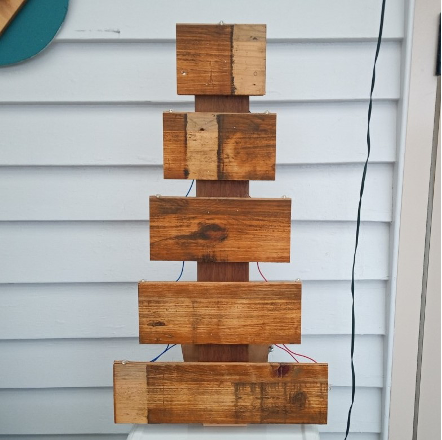
Wooden Pallet Christmas Trees
What you will need:
- Pallet or discarded wood
- Jigsaw
- Wood glue
- Paint or stain
Method
- Mark out 5-8 parts of wood in increasing measurements of your choice in size (8,16, 24,32,40cm etc). Map out the largest piece of wood, 2cm gap, 2nd largest piece of wood, 2 cm gap and so on.
- Measure the required length of your back support needed and cut
- Angle cut the rear stand piece so the tree is at a slight rear angle to not fall over.
- Cut the lengths of these pallet wood pieces using a band saw, jig-saw or circular saw. Sand down pallet wood, if needed.
- Stain or paint, if desired by brushing on and ragging off to show through the wood grain.
- Glue smallest to largest to your support wood and leave for 24 hours to dry.
- Glue support to angled stand and leave 24 hours to dry
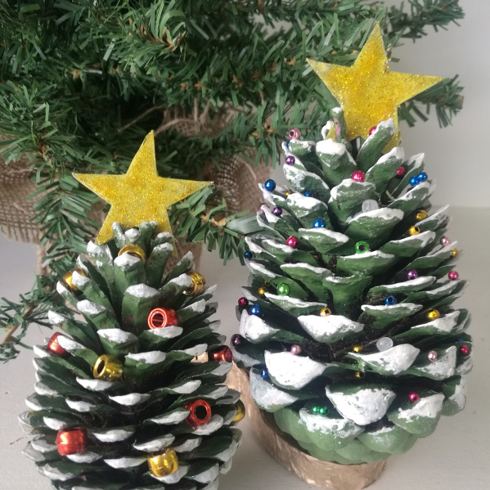
Pine Cone Xmas Craft
What you will need:
- Pine cones
- paint
- Glue gun and glue sticks
- Beads
- Cardboard
- Wool or twine
Method
- Based paint your cone green and let dry
- Paint the tips of the cone white or red and let dry
- Glue on tiny beads to the edges of your pine cone
- Cut out a cardboard star and paint yellow
- Glue star to the top of the tree
- Tie wool/ twine to the top of your pine cone and attach to your tree.