Three easy shabby chic DIY projects
Like the idea of recycling old furniture, but lack the time or patience for finicky restorations? A shabby chic makeover is the simplest way to breathe new life into old stuff
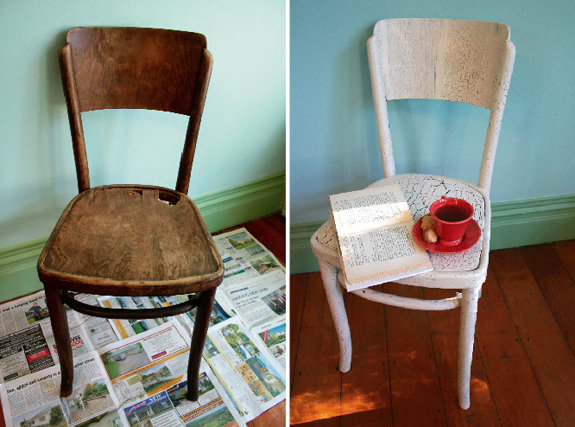
Click images below to enlarge the how-to process


What you will need
- Dated or damaged item of furniture
- Sand paper, grades 60–80
- Pot scouring pad
- Antique white paint (quantities will vary: this cabinet used 1½ litres and the chair less than 500ml)
- Resene’s Enamacryl gold and silver paint (only for method 2)
- Resene Crackle (only for method 3)
- Hammer and drill (optional)
- Lumbersider base paint (optional)
Paint and sand
Suitable for cabinets, tables, trolleys and dressers
- Remove any knobs you don’t want to paint. If they are modern looking you may wish to paint them separately with a dark matt enamel, or replace with antique knobs. Look out for vintage ceramic or brass knobs at garage sales or on Trade Me.
- Lightly sand your piece. Wood dust can cause health problems, so ensure any sanding is done in a well ventilated area. Fortunately, you don’t have to sand the entire surface—concentrate on frequently used areas (handles and shelf surfaces) and along door edges where extra paint may cause jamming. If necessary, add more antiquing by randomly hammering small dents or even drilling fake borer holes. (Real borer holes vary in size and are not perfectly vertical.)
- Brush off the wood dust and wipe down all surfaces with a damp rag.
- Always pour paint into another container before applying: it’ll be easier to hold while painting, and the paint tin’s rim will stay clean for airtight resealing of any surplus paint. For a basic aged white we used good ol’ Spanish White from Resene’s whites and neutrals range.
- Cover the entire piece of furniture with paint, following the wood grain with your paint strokes. For a layered, white-washed effect, water down some of the remaining paint, tint slightly by adding a few drops of another colour and, once the top coat is dry, paint on a rough second coat.
- As soon as the paint is dry to the touch, you will be able to add small scuffing marks by scrubbing a pot scourer in a circular motion. Use sandpaper to mimic the aging effects of wear and tear by sanding edges, handles and other parts that receive the most scuffing. Follow the wood grain with your sanding action. Take care not to overdo it—work quickly over the whole dresser and stand back to see if more is required. Once finished, put any knobs back on, dust off the dresser and wipe again with a damp cloth.
Crackle effect
Suitable for chairs, frames, small boxes or trays, or as detail on dressers and cabinets
The crackle effect is a two-part process. A layer of clear crackle paint is applied and left to dry. When the topcoat is painted on, the crackle layer is activated, revealing the base colour underneath.
Dark or stained wood makes a more dramatic contrast than lighter wood, or you can paint an entirely new base colour to contrast with the topcoat.
- The beauty of the crackle effect is that it disguises mismatched wood. Any broken parts can be replaced with a different material, as long as you paint it a matching base colour.
- Lightly sand your piece. Try not to sand stained wood back to bare wood or it will soak up too much of the crackle paint and may not crack as effectively.
- Apply clear crackle paint. The final effect will vary depending on the amount applied. A thick coat will result in fewer deep cracks, a thin coat will create small, shallow cracks.
- Once dry, quickly paint the topcoat using a lot of paint on your brush and minimum paint strokes. Avoid painting over the same spot twice, as this will cause both paint layers to lift. Cracks will appear as the topcoat dries.
Two-tone metallic
Suitable for picture and mirror frames, small boxes or trays
- If painting a frame, cover glass or mirror with paper and masking tape. Paint your frame, tray or box using an aged white (see method 1, step 4).
- Using a small paint brush and long strokes, paint with Enamacryl silver paint, roughly covering half of the surface and leaving patches where the white shows through.
- Before the silver paint dries, soften edges by wiping the painted surface with a scouring pad, moving in the same direction as the paint strokes.
- Using the same painting and wiping method, cover half of the remaining white with Enamacryl gold paint, leaving patches of both the white and silver showing. For a distressed effect, flick a little more of the silver paint onto the final surface. Remove paper and masking tape and wipe off any paint from the mirror or glass.